


Last week I conducted a NAV Development update to the development team of a Dutch NAV partner. One of the topics we touched was the One-Page Matrix introduced in NAV 2009 SP1. The What’s New in Microsoft Dynamics NAV 2009 Service Pack 1 – Installation and Development manual contains a lab that lets you build a One-Page matrix, but the end result is not complete and the overview (what am I doing exactly?) is a bit missing. Therefor I decided to try my best and make up some kind of step-by-step recipe for this (see below).
But First …
It’s good to realize that a matrix is a very useful mean to show the relation between two entities (i.e. tables in NAV). In other words: to see what these two have in common. As in the screen below it might be of interest to get insight in what items our customers have ordered (not yet invoiced/shipped).

This relation between two entities (in our example Customer and Item) is to be found in a third entity being the Sales Line.
From a mathematical perspective a matrix is a 2-dimensional image, with the one entity (Customer) along the X-axis and the other (Item) along the Y-axis. Any combination of X and Y, being a cell in our matrix, represents the relation between this two specific instances of these two entities.
Knowing your math you might ask if we could create a 3-dimensional matrix. No and Yes (or Jein in German),
No …
… if we image ourselves something like a Rubik’s cube.
Yes …
… if we would add a filter to the matrix where it would allow us to show (for a specific filter value) a specific intersection of a 3-dimensional matrix.
One-Page Matrix Step-by-Step (high level)
At a high level my step-by-step recipe looks like this:
- Creating matrix subpage
- Creating matrix main page
- Defining horizontal dimension (matrix subpage)
- Setting horizontal dimension 1 (matrix main page)
- Setting horizontal dimension 2 (matrix subpage)
- Populating matrix cells (matrix subpage)
- Updating page (matrix main page)
- Browsing horizontal dimension (matrix main page)
One-Page Matrix Step-by-Step (detail level)
And adding all relevant details:
1. Creating matrix subpage
In this first step we setup the first part of the skeleton for our One-Page matrix: i.e. the page structure for the mutli-columns subpage that will display the vertical and horizontal dimensions and their intersecting matrix cells. We create this subpage by using the wizard as introduced in NAV 2009 SP1:
- Start the Page Wizard
- Select source table (vertical dimension)
- Select page type (ListPart)
- Select representative rows for source table (row headings)
- e.g. “No.”/Code + Name/Description
2. Creating matrix main page
In this second step we setup the second part of the skeleton for our One-Page matrix: i.e. the page structure for the main page including FastTab(s) and subpage placeholder.
We create this main page by also using the wizard:
- Start the Page Wizard
- Select source table (vertical dimension)
- Select page type (Card)
- Set Options FastTab
- Note: the wizard does only set Name and not Caption. See also my blog post How-to: Make Sure Your Pages Can Be Translated
To this we need to manually add MatrixForm Part that links to matrix subpage, i.e. set PagePartID
3. Defining horizontal dimension (matrix subpage)
Now that we have defined the vertical dimension, we need to create controls (i.e. columns) to define the horizontal dimension. For this we add columns to matrix subpage by a simple copy & paste from an existing matrix subpage:
- e.g. PAG9231 – 32 columns
- Not from PAG9237 (Resource Capacity) as each column contains validation code we do not need/want
To get the object compiled:
- Declare (global) variables
- MATRIX_CellData
- MATRIX_ColumnCaption
- Field1Visible through Field32Visible
- Note: have a look at the Visible property of the columns controls
- Declare function MatrixOnDrillDown
- Out comment code for time being, we will get back to that later
- Copy function as a whole from C/AL Globals (see my blog post Live is simple if you know how – C&P chapter 2)
4. Setting horizontal dimension 1 (matrix main page)
To be able to control the content of the column headings (horizontal dimension) from the main page we need to declare the function SetColumns (copy from PAG491). A call to SetColumns should be made from the OnOpenPage trigger (see PAG491) to initiate the headings content when opening the page.
To get the object compiled:
- Out comment blocking and non-relevant parts
- Declare (global) variables
- MATRIX_CaptionSet
- MatrixRecord – Link to horizontal dimension
- MatrixRecords – Link to horizontal dimension
- MatrixRecordRef
- MATRIX_PKFirstRecInCurrSet
- MATRIX_CaptionRange
- MATRIX_CurrSetLength
- MATRIX_SetWanted
5. Setting horizontal dimension 2 (matrix subpage)
Now that we have created a function to control the column headings from the main page, we also need an interface to exchange the result from main to subpage, i.e. a function called Load (copy from PAG9231).
To get the object compiled:
- Declare (global) variables
- MatrixRecords – Link to horizontal dimension
- MatrixRecord – Link to horizontal dimension
- Make sure that parameters also link to the right dimension
6. Populating matrix cells (matrix subpage)
Having set the vertical and horizontal dimensions we should now calculate the content of the crossings/intersections of the vertical and horizontal dimensions (on matrix subpage) coding OnAfterGetRecord (copy from PAG9231). For this we need to determine number of columns being used in the OnOpenPage trigger.
In order to have only relevant cells (i.e. columns) shown we set the columns visibility variables to TRUE (OnInit – copy from PAG9231) and declare function SetVisible (copy from PAG9231) to allow us to dynamically update the visibility.
To get the object compiled:
- Declare variables
- MATRIX_CurrentColumnOrdinal (local)
- MATRIX_NoOfMatrixColumns (global)
- Declare function MATRIX_OnAfterGetRecord
-
See PAG9231 for example, but code depends on the specifics of our matrix
-
7. Updating page (matrix main page)
All code set to update the dimensions and intersecting matrix cells. Now one function is needed that will pass the updates from main to subpage: UpdateMatrixSubform (copy from PAG213 (One-Page matrix!)). Note that the call of Load function (on subpage) should be updated to fit the definition of Load on subpage and should be first called when opening page (OnOpenPage).
8. Browsing horizontal dimension (matrix main page)
The only remaining major part of our One-Page matrix is the set of buttons that alow us to browse through the horizontal dimension:
- Next Set
- Copy from PAG491
- Add call to UpdateMatrixSubform
- Previous Set
- Copy from PAG491
- Add call to UpdateMatrixSubform
- Next Column
- Copy from PAG538
- Update code (incl. extending SetColumns function – parameter SetWanted and global variable MATRIX_SetWanted)
- Previous Column
- Copy from PAG538
- Update code (incl. extending SetColumns function – parameter SetWanted and global variable MATRIX_SetWanted)
9. Further
Now the matrix is doing quite well, but to make it complete we have some attributes left:
Note that these attributes can be specific to each matrix page.
- Standard (i.e. to be found on standard matrix pages)
- DrillDown (matrix subpage))
- See PAG9231 for example, but code depends on the specifics of our matrix
- InsertAllowed/ModifyAllowed/DeleteAllowed (matrix main page)
- SSet to No
- Editable=No (matrix subpage)
- Format cells(matrix subpage)
- i. Set AutoFormatType to 1
- ii. Not DecimalPlaces
- Toggle between “No.”/Code + Name/Description in the column headings (matrix main page)
- Copy from PAG491
- Control on Options FastTab
- Code in SetColumns
- Declare (global) variable
- ShowColumnName
- Declare function ShowColumnNameOnAfterValidate
- Add call to UpdateMatrixSubform
- Copy from PAG491
- DrillDown (matrix subpage))
- Non-Standard
- Freeze pane (matrix subpage)
- Set FreezeColumnID property of Repeater control
- Note: although this is very useful, it’s not set on standard matrix pages! Don’t ask me why.
- Automatic Update of Page (matrix main page)
- Declare function UpdateThePage – Using WshShell.SendKeys
- Freeze pane (matrix subpage)
Notes
- Over time this post might change due to new insights:
- 2012-04-30 first update
- Concluding every high level step (1 through 8) you should be able to run the matrix and see the effect of what you have done so far.
-
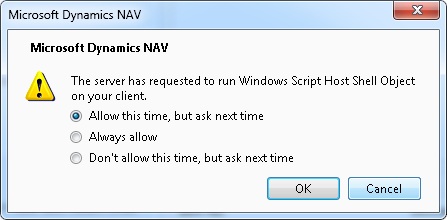
Using the Windows Script Host Object Model will ask the user if this call to this external component is allowed:
-
Of course NAV has a number of matrices that have most of the above in common. However they all have some differences too. Have a look at them to learn from these differences. The list below show the main pages for the standard One-Page matrices in NAV 2009 SP1
Page ID
Page Name
113
Budget
2213
Resource Capacity
214
Res. Group Capacity
538
Dimension Combinations
9252
MyDim Value Combinations (previously form 539)
7138
Purchase Budget Overview
7139
Sales Budget Overview
99000919
Production Forecast